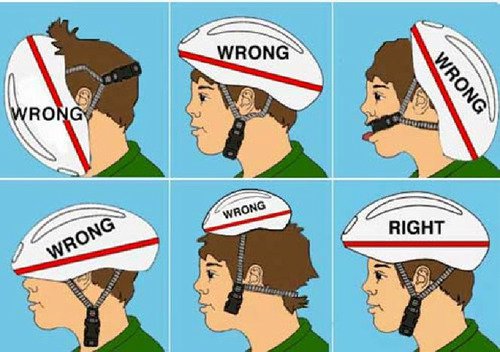
Here's a simple guide for fitting your cycling helmet
Saturday 12th July 2014

Fitting your cycling helmet is easy.
STEP 1 - Size It:
- Know your size. Different brand cycling helmets can vary in size.
- If you don't know the size you need, measure the circumference of your head by wrapping a measuring tape around your head just above the ears and level front to back. Use the specific manufacturers size chart to determine the correct size. Make sure the helmet fits your head snugly and comfortably. If it does not, you should replace it with another size or model that does. The helmet should be positioned low enough in the front to protect the forehead.
STEP 2 - Adjust the Fit and Stabilizing System:
Most helmets come with an adjustable fit and stabilizing system. These systems enhance the fit and stability of the helmet, but they are not a replacement for the helmet's straps and fit pads. The helmet should be adjusted while on your head.
- Adjust the stabilizing system until the helmet grips your head snugly, but not too tightly.
- Make sure the helmet is comfortable and feels secure.
STEP 3 - Adjust the Chinstrap and Buckle:
- Fasten the chinstrap buckle and tighten the straps until the helmet fits snugly. How snugly? You should be able to open your mouth wide enough to eat without feeling choked or pinched.
- Make sure the chinstrap is well back against the throat (NOT on the point of the chin) and that the loose ends of the strap pass through the rubber O-ring near the buckle. This helps to keep the strap from sliding loose and/or the helmet from sliding around or coming off accidentally.
- The chinstrap buckle should be fastened and the strap pulled snugly before riding.
STEP 4 - Adjust the Interior Pads:
The helmet fits correctly when it is held firmly but comfortably in place by the fit system, straps, and interior fit pads. Fit pads are not provided with all helmets. If provided, they are held in place by "hook and loop" fasteners, so you can adjust the fit of the helmet by moving the pads slightly or by using any combination of the different thickness pads sometimes provided with the helmet.
STEP 5 - Check the Fit:
- Once you think the proper fit has been achieved, grab the helmet and twist it to the left and to the right. If the helmet fits, the skin on the forehead will move as the helmet moves. If it does not, the helmet may be too loose. Snug the fit system or try a different size.
- Grap the helmet and try to remove it by rolling it forward and backward. If you can roll it off your head completely, roll it so far forward that it blocks vision or back far enough to expose the forehead, it doesn't fit correctly. Adjust the straps and/or fit system and try again.
- If you cannot adjust the helmet to fit properly according to these instructions, DO NOT USE THIS HELMET. Replace it with a different size or model.
Once you are satisfied that the helmet fits correctly and that all straps are properly adjusted and tightened you should take a short test ride. Pay close attention to overall comfort and helmet stability while riding and make any adjustments needed to improve comfort or stability. If you have any questions contact us at WeberSports.com


